On this page
- Are You Overwatering Your Cannabis Plants?
- Why Does pH Matter More Than You Think?
- Is Your Grow Light Too Close or Too Far Away?
- What Happens When You Skip Airflow?
- Are You Ignoring Humidity During Flower?
- Are You Feeding Nutrients Too Early?
- Why Shouldn't You Grow a Bag Seed for Your First Run?
- Are You Growing an Autoflower the Same Way You'd Grow a Photoperiod?
- How Often Should You Be Checking on Your Plants?
- Did You Plan for Odor Control?
- Did You Forget to Set a Light Timer?
- What Happens When You Don't Track Your Grow?
- Are You Harvesting Too Early?
- Your First Grow Is a Long Feedback Loop
13 Mistakes That Ruin a First Cannabis Grow (and How to Avoid Them)
You bought the tent. You ordered the seeds. The light came on, and you hung it from the crossbar using the included ratchet hangers. Everything looks right.Then, two weeks in, your seedling is stretching toward the light, as if trying to escape. Or the leaves are curling. Or the stem is flopping over. And you're on Reddit at midnight trying to figure out what went wrong.We've been there. Every grower on the BudSites team has killed at least one plant while learning these lessons. This guide exists so first-time cannabis growers don't have to repeat them.
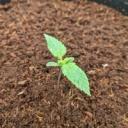
Are You Overwatering Your Cannabis Plants?
Overwatering is the number one problem for almost every first-time grower, and the top entry on every list of common mistakes growing weed.New growers water too often because it feels productive. Your plant looks thirsty. Water it. Soil looks dry on top? Water it. Walked past the tent and haven't done anything today. Water it.Cannabis roots need oxygen. When the growing medium stays saturated, roots suffocate and start to rot. The overwatering cannabis symptoms look a lot like underwatering (drooping leaves, yellowing lower foliage, slowed growth), which tricks people into watering even more.If you're growing in coco coir, which we recommend in our beginner's setup guide, the rules are a bit different from those for soil. Coco should stay moist but never waterlogged. Water when the top inch feels dry, and the pot feels noticeably lighter than it did right after watering.How often to water cannabis seedlings comes down to pot size and medium. A seedling in a one-gallon fabric pot might only need water every two or three days. In a five-gallon pot, it could be once a week. The rule: if you're unsure whether to water, wait a day. Young plants in big pots need surprisingly little water.We wrote a full guide on how to spot and fix overwatering in coco coir if you want to go deeper.If you want to stop guessing, the BudSites grow app lets you log each watering and flags when your schedule looks off for your medium and pot size.
Why Does pH Matter More Than You Think?
Many beginners skip pH testing entirely. They buy good nutrients, mix them at the right ratios, and feed on schedule. The plants still look terrible. Yellowing leaves, brown spots, stunted growth.Nine times out of ten, the answer is pH.Cannabis roots can only absorb nutrients within a narrow pH window. The best pH for cannabis in coco is roughly 5.8 to 6.2. If you are growing in soil, the range shifts to 6.0-6.8. Outside those ranges, nutrients lock out. Your plant is sitting in a perfectly mixed solution and starving.Get a decent pH pen. Apera and Bluelab both make reliable ones. Test every feeding. Adjust with pH up or pH down before you pour. Calibrate the pen regularly because it drifts.This is also a good thing to log consistently. The BudSites app lets you record pH alongside every feeding entry so you can spot trends before problems show up on the leaves.
Is Your Grow Light Too Close or Too Far Away?
Grow light manufacturers include recommended hanging heights for a reason, but almost nobody reads the manual on the first grow. So, how far should an LED be from cannabis seedlings?Hang the light too close during the seedling stage, and you'll burn the tops. The leaves will taco (curl upward along the edges), develop yellow or bleached patches, or just look stressed. Hang the light too far, and the plant stretches, developing a long, weak stem that can barely support itself.During the seedling stage, most LED panels should be 24 to 30 inches from the canopy, dimmed to around 40 to 50 percent. As the plant matures, you can gradually lower the light and increase intensity. Our post on why investing in a quality grow light pays off covers how to read your specific light's PPFD chart.Autoflowers are especially sensitive to light stress in the first two weeks, so start on the higher end of the range and only bring the light down once you see vigorous vegetative growth.A cheap lux meter app on your phone can give you a rough idea of whether you're in the right range. For greater accuracy, pick up a PAR meter or use the PPFD maps published by most reputable light manufacturers for their products.You can log your light height and dimmer setting at each stage in the BudSites app, and the assistant will flag if the number you entered is outside the safe range for that stage.
What Happens When You Skip Airflow?
Stagnant air inside a grow tent causes two problems. First, it creates pockets of heat and humidity that invite mold, bud rot, and white powdery mildew. Second, without gentle air movement, stems grow thin and weak because they never develop the structural strength that comes from resisting a breeze.You need air moving inside the tent (an oscillating fan) and air cycling out of the tent (an inline exhaust fan). We covered specific equipment recommendations in the setup guide and in our roundup of the best grow tents for small spaces, but the key point here is that both types of airflow matter.A common first-grow mistake is running the exhaust fan but forgetting the oscillating fan. Or putting the oscillating fan on full blast aimed directly at a seedling, which dries it out and causes windburn. Keep the breeze gentle. You want leaves rustling lightly, not flapping.Poor airflow combined with high humidity during flower is the single most common cause of bud rot, which can destroy a harvest in days. Which leads directly into the next mistake.
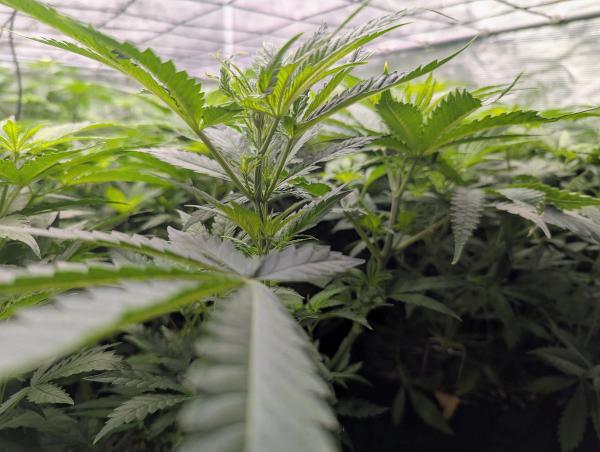
Are You Ignoring Humidity During Flower?
Cannabis humidity flower stage is where a lot of first grows go wrong, and it's the difference between a clean harvest and one you have to throw out.Vapor pressure deficit (VPD) gets complicated fast, but you don't need to master it on your first grow. You just need to keep relative humidity in a reasonable window for each stage:
- Seedling: 60 to 70 percent RH
- Vegetative: 40 to 60 percent RH
- Early and mid flower: 40 to 50 percent RH
- Last two weeks of flower: under 40 percent RH
The reason the last two weeks matter so much is bud rot prevention. Dense, finished buds trap moisture inside the flower. If the tent sits at 60 percent humidity in week eight, you can open the tent one morning and find brown, mushy centers in your biggest colas. By the time you can see it from the outside, it's usually too late.A cheap hygrometer sitting at canopy level is enough. The AC Infinity Cloudcom or any $15 digital hygrometer works. Check it daily. If humidity is creeping up, pull in a dehumidifier, increase exhaust, or defoliate to improve airflow through the canopy.The BudSites app lets you log daily humidity readings so you can catch creeping RH before it becomes bud rot.
Are You Feeding Nutrients Too Early?
This one comes from excitement. You just bought a full nutrient line. You want to use it.Seedlings don't need nutrients for the first week or two. If you're growing in coco, you can start with a very light feed of around 200 to 300 PPM once the first true leaves appear. In soil with added amendments, the plant may not need supplemental feeding for three to four weeks. Our coco feeding guide has a full schedule for the first few weeks.Too much too soon causes cannabis nutrient burn. The leaf tips turn brown and crispy, working their way inward as the burn gets worse. In severe cases, the whole plant yellows and growth stalls completely.Start low, increase gradually, and pay attention to how the plant responds. This is where a grow journal pays off big. Write down exactly what you fed, how much, and what the plant looked like the next day. The BudSites app is built for exactly this kind of tracking, and the nutrient plan feature can help you adjust if something looks off.
Why Shouldn't You Grow a Bag Seed for Your First Run?
This one is tempting. You found a seed in some flower you bought and figured, free seed, why not?The problem is you have no information about that seed. You don't know if it's male or female. You don't know the strain. You don't know how long it needs to flower or how tall it gets. You don't know if the genetics are stable.A male plant produces pollen instead of buds. If you don't catch it early enough, it can pollinate your female plants and fill your harvest with seeds. And because you won't know the sex until weeks into the grow, you'll have invested time, nutrients, electricity, and water into a plant you might have to pull. (Our guide on how to tell if your cannabis plant is male or female covers what to look for during pre-flower.)When it comes to bag seed vs feminized seeds for your first run, feminized wins every time. Feminized seeds from a reputable seed bank cost money, but they remove a huge variable. You know the sex, the expected flowering time, the rough growth pattern, and usually the nutrient preferences. Our guide on picking a seed bank has recommendations if you're not sure where to start.Autoflower seeds are another beginner-friendly option because they flower on a timer instead of a light schedule change, which removes another variable. Which brings us to the next mistake.
Are You Growing an Autoflower the Same Way You'd Grow a Photoperiod?
Autoflower vs photoperiod is one of the most confused topics for new growers, and treating one like the other wrecks a lot of first grows.Photoperiod plants start flowering when you switch the light schedule from 18 hours on / 6 off to 12 hours on / 12 off. Autoflowers ignore the light schedule entirely. They start flowering based on age, usually around week three or four from seed, regardless of whether the light is on 18 hours or 24.Practical rules for autoflowers:
- Keep them on 18/6 or 20/4 from seed to harvest. No light schedule change needed.
- Do not transplant mid-grow. Autoflowers hate stress, and a transplant during their short veg window can cost you weeks of growth you'll never get back. Start them in the final pot.
- Total timeline is shorter: 10 to 12 weeks seed to harvest is typical, versus 14 to 20 for a photoperiod.
- Final size is usually smaller. Autoflowers rarely hit the same height or yield as a well-grown photoperiod, so plan your space and expectations accordingly.
- Feed lighter. Autoflowers tend to nutrient burn at PPM levels a photoperiod would shrug off.
If you planted an autoflower and tried to flip it to 12/12 at week four, you didn't actually trigger flowering. You just cut six hours of daily growth off a plant that was already flowering on its own. That's why it looks stunted.The BudSites app has separate grow templates for autoflowers and photoperiods so the schedule and nutrient plan match what you actually planted.
How Often Should You Be Checking on Your Plants?
There's a sweet spot between neglect and obsession, and most beginners land on the obsession side.Checking on your plants ten times a day doesn't help them. It usually leads to unnecessary adjustments. Moving the light around, adding a splash of water, bending a branch, plucking a leaf that looked slightly off. Every one of those micro-interventions can stress a young plant.Once a day is enough for the first few weeks. Check soil moisture, look at the leaves, note anything that changed, and then leave the tent alone.As you enter vegetative growth and start training, you'll interact with the plants more, but even then, let changes settle for a day or two before deciding something is wrong. Cannabis is a resilient plant. It can recover from most minor stresses on its own if you give it time.
Did You Plan for Odor Control?
This catches people off guard around week three or four of flowering. The smell goes from faint to overwhelming fast, and it will fill your entire living space if you don't have a grow tent carbon filter in place.A quality carbon filter attached to your inline exhaust fan handles this. The filter scrubs the air before it exits the tent, and if the tent is properly sealed, very little smell escapes.If you followed our setup guide and picked up an AC Infinity inline fan, adding a carbon filter is straightforward. Size the filter to match your fan's CFM rating and replace it when it stops being effective, usually every 12 to 18 months depending on usage.If you are doing a stealth grow in an apartment or shared space, the carbon filter is non-negotiable from the first week of flower. The smell during peak flower can be strong enough to drift into hallways, neighboring units, and the parking lot.Plan for this before you start flowering. Ordering a carbon filter after the smell becomes a problem means several days of very loud, very obvious cannabis odor in your home.
Did You Forget to Set a Light Timer?
A $12 mechanical wall timer or a $20 digital smart plug is one of the cheapest pieces of equipment in your whole setup, and skipping it is one of the easiest ways to ruin a grow.Inconsistent light schedules stress cannabis plants. Skipping a day, turning the light on two hours late, or letting a roommate flip the switch at random times can slow vegetative growth and, during flower, cause photoperiod plants to hermie (develop both male and female parts and self-pollinate). A hermied plant pollinates itself and every other plant in the tent, and you end up with a seeded harvest.Set a timer before you plug the light in for the first time. Test it by watching the light cycle once. Keep a backup timer on hand so you're not scrambling if the first one fails.
What Happens When You Don't Track Your Grow?
You just pulled off a solid harvest. The buds are dense, the smell is incredible, and you're proud of what you grew. Someone asks what nutrients you used during week five of flower.And you can't answer, because you didn't write any of it down.Without a grow journal, every grow starts from scratch. You can't replicate your successes or diagnose your failures without data. You're guessing every time.Track your feedings, pH readings, light schedule changes, environmental conditions, and any training you do. Take photos regularly so you can compare growth over time.This is why we built the BudSites app. It keeps your grow journal organized, lets you upload photos tied to specific dates, and gives you an AI-powered grow assistant you can ask questions when something looks wrong. It's free and available on both iOS and Android.
Are You Harvesting Too Early?
After weeks of careful watering, feeding, training, and monitoring, it's tempting to chop the moment you see fat buds. But harvesting too early is one of the most common beginner cannabis grow mistakes, and it directly affects potency, flavor, and yield.Trichome color at harvest tells the story. When trichomes are mostly clear, the plant isn't ready. When they turn milky white, THC levels are near their peak. When they start going amber, some THC converts to CBN, which produces a more sedative effect.Pick up a cheap jeweler's loupe or a USB microscope so you can actually see the trichomes up close. Don't rely on how the buds look from a distance.Most growers want mostly milky trichomes with 10 to 30 percent amber. More amber shifts the effect toward sedative. Less amber keeps it more energetic. Your target window depends on the effect you want.Give your plant the time it needs. A week or two of patience at the finish line can be the difference between an average harvest and a great one. If you want a sense of the full timeline so you can plan the finish, our guide on how long it takes to grow weed walks through every stage.Log a trichome photo in the BudSites app each day during late flower. The assistant can help you decide when your ratio hits your target window.
Your First Grow Is a Long Feedback Loop
Growing cannabis at home is a skill that gets better with every run. The first grow is about learning, making a few mistakes, and figuring out what works in your specific space with your specific equipment. Don't aim for perfection. Aim for a finished harvest and a notebook full of data to build on next time.If you're looking for a place to track everything and get help along the way, download the free BudSites grow app for iOS or Android and start logging your grow from day one. Feedings, pH, humidity, photos, and a 24/7 AI assistant that can help you diagnose problems before they cost you a harvest.